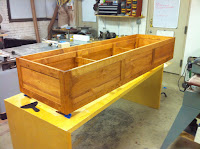
Here are some pics of the completed four-drawer chest (see my recent blog posts for history on this project). It is made from 3/4" 3-ply bamboo plywood and MDF. The tall drawers slide out from their flush-mounted resting places, revealing shelves for DVDs and CDs. Click "more" to see whole post and more pics (below)
▼
Monday, December 27, 2010
Finshing Techniques: Oil ON TOP OF urethane?
A project that began last week is almost finished. The four-drawer chest, made of bamboo plywood, was commissioned by a friend. As of this writing - the night before the chest is due to be picked up from my Allston studio - the chest is curing after being brushed one last time with super-fine, 00000 steel wool.
Tuesday, December 21, 2010
4-Drawer Chest, Day 2
My last post was about a project brought to me by a friend, who wanted to salvage a neat 4-drawer chest from her lab. The unique drawers of this piece - which was custom-made to hold VHS tapes in the 1980s - were saved intact, while the case was destroyed in the move. My task is to re-build the case, re-fit the drawers, and re-face the drawers with the same attractive bamboo plywood I'm to using build the case.
Sunday, December 19, 2010
Reverse-engineering a 4-drawer chest
A friend of mine brought me this challenging job: re-building the case of a 4-drawer chest, which had been destroyed during a move. Since the drawers were intact, and complicated to build, my friend wanted to keep them, and only wanted the case rebuilt. This is backwards: usually drawers are made to fit the case. Nevertheless, I welcomed the challenge, the $$, and the chance to work with a new product I've been dying to try: bamboo plywood.
I purchased 3/4" bamboo plywood from Cali Bamboo. In spite of the hefty freight fee, it was still cheaper than buying locally. Bamboo plywood isn't cheap, though: at just over $200/sheet, including shipping, mistakes with this material are expensive!
Wednesday, December 15, 2010
Decimal inches to fractional inches calculator
Need to convert decimal inches to fractional inches, rounded to your choice of any denominator from 2 to 1000? Go here: http://www2.whidbey.net/ohmsmath/webwork/javascript/decin2fr.html
When designing wooden furniture, most people in the U.S. use fractional inches as their metric. There are plenty of reasons: we're used to the Imperial system, most of our tools use Imperial, fractional graduations, and much of the lumber we buy - most of all sheet goods - is measured in fractions of an inch.
This causes a problem for designers who like to adhere to certain ratios - such as the Golden Ratio - in their work. I'm among those who often
Tuesday, December 14, 2010
Please Join the Wine on Deck Newsletter
When you do, you'll receive a 50% off coupon - good for any purchase at the Wine on Deck website: http://www.wineondeck.com/googlemall.html
Subscribe to The Wine on Deck Newsletter |
Visit this group |
Saturday, December 11, 2010
Rubbing out a satin finish
Right: sanded flat to 220; Left: rubbed with pumice & oil |
Sunday, December 5, 2010
Compound You, Angles!
It was bound to happen. Sure, most furniture is made exclusively with right-angles. But I knew that some day I would have to face compound angles. I thought it might be while fitting crown molding, or cutting raised-panel frames. Turns out, my first experience with compound angles was tougher and more complicated than either of these two brain-busting tasks. What's a compound angle, you ask? Take a look at this image:
Notice how the piece of purple heart on the left has slanted edges, AND is shaped roughly like a trapezoid? Those are compound angles.
Friday, December 3, 2010
Kris V: The Casemaster
My friend Kris is a seasoned carpenter who has also been joining me on my joinery journey. I'm sure he won't be embarrassed or angry if I publish some pictures of him here.... ;-)
In these photos, Kris is putting glue into a groove, as we go through the tense and time-sensitive process of "gluing-up" a cabinet case. This particular case was a seven-foot long terrarium stand for a mutual friend of ours.
Although many furniture makers work alone, there are some cases where an extra pair of hands is helpful or even absolutely necessary. With Kris, I benefit from the extra eyes and brain as well. Sure, I have to split the money, but I make half the mistakes, so it works out well in the end.
90 Gallon Aquarium Stand Doing its Thing!
Supporting nearly 1400 pounds of rock and water, one of my aquarium stands is home to a 90-gallon reef aquarium that's just getting started. It's a snug fit in a small room, but the owner of the tank is moving in a couple of months, where the 90 gallon tank will be in an appropriately-sized viewing room.
Tuesday, November 30, 2010
In the Design Phase: My "Wrap 270" Aquarium Cabinet
designed in the free version of Google Sketchup |
It's only fitting that so many of my custom furniture commissions are aquarium cabinets. I'm an aquarist myself: as a young teen I volunteered at the Smithsonian National Museum of Natural History's coral reef exhibit, a leading light in reef-keeping technology and methodology, which were poorly developed at the time. In high school, my friends and I founded an official Aquarium Club, and I bred South American Convict and Oscar Cichlids. Today, I'm caretaker to a 55-gallon reef with a pair of clown fish and a pair of watchman gobies, both of which spawn once a month or so.
Most aquarium people find the cabinet stand a source of annoyance, sticker shock, and even disaster. The stand is the LAST thing an aquarist wants to spend money on. They're usually finished in black, to make them as invisible as possible. In fact, if there were a way to eliminate the cabinet stand altogether, I think most aquarists would rejoice.
And yet, the bane of the aquarist must be of high quality, and of sufficient internal volume, and be finished to a level equal to that of the other furniture in the viewing room. The whole reason people come to me for cabinet stands is because when you've got fifteen-hundred pounds of water suspended above your living room floor, you really can't skimp on quality.
Seven-foot cabinet stand success!
In my previous post, I discussed a project for a friend: a seven-foot-long cabinet stand for his 250-gallon glass terrarium, which is home to two tortoises. Now that the project is completed, I thought I'd post some pictures of the stand in use.
This particular project was special because my friend Kris helped me. Kris is an experienced carpenter but - like me - new to furniture making. We both learned a lot on this project. I think I can speak for Kris when I say that one thing he learned (and I continue to marvel about) is how much better it is to use traditional cabinet making techniques when making a cabinet, as opposed to making a box as a contractor might build a temporary work bench.
The cabinet has a 1" lip to hold the tank, with 1/8" gap |
This particular project was special because my friend Kris helped me. Kris is an experienced carpenter but - like me - new to furniture making. We both learned a lot on this project. I think I can speak for Kris when I say that one thing he learned (and I continue to marvel about) is how much better it is to use traditional cabinet making techniques when making a cabinet, as opposed to making a box as a contractor might build a temporary work bench.
Wednesday, November 24, 2010
Another frame-and-panel cabinet stand...
First coat: cherry stain on the birch case |
Thursday, November 11, 2010
Laminated scrap table project
The Wine on Deck shop creates very little scrap these days. But this wasn't always true, and so there was a box full of laminated off-cuts in the corner of the shop for months. I decided to make some table tops out of the scraps. i got three tops out of the scraps, and decided to tackle each on individually, in order to learn as much as I could about apron & leg design while making three different tables.
Wednesday, November 10, 2010
FedEx is great!
I bemoaned UPS in a recent post. Just to show I'm not a bad customer, I'd like to take the time to praise FedEx for their service. Easy to do online, easy to have picked up, easy to pay. Packages are getting to clients without trouble. I'm in love. Thanks, FedEx.
When it absoutely, positively, has to be black...
I was recently asked to make some custom aquarium cabinet stands. Apart from having to support over 1,000 pounds, my customer also wanted one of the stands in black. Needless to say, I was more concerned about the weight-bearing capability of my cabinet design than I was about the finish. Turns out, getting a good black on wood is more difficult than it seemed at first. After a few failures and a lot of experimenting, I have a few methods for getting a deep, rich black. I also have a few general tips on finishing in black in general.
Aquarium Stands: Cabinetmaking under Pressure!
I was recently asked by my to build some custom aquarium stands for people with unusually large or odd-shaped aquariums. Since I'm a long-time fish enthusiast and owner of a 55-gallon reef aquarium, I loved the idea of building the "ultimate" cabinet stand. A good tank stand, by the way, is hard to come by. Manufacturers of these stands use the cheapest possible materials. Who can blame them? Most customers, myself included, are already reeling from the unexpectedly high cost of setting up a large aquarium. When it comes to stands, it's a race to the bottom.
Experienced aquarists, however, know the value of a well-made stand that won't turn to mush if soaked with water for a day or two. Advanced aquarists, such as my potential customers, require custom dimensions and other features to allow them to use sophisticated sump systems.
Building the first of these stands was a great chance for me to hone my custom cabinetry skills - under the pressure, literally, of hundreds of gallons of water.
My first commission was a frame-and-panel cabinet stand for a 90-gallon tank. That's about 1,400 pounds of water and rocks. As it turns out, the standard frame-and-panel design seen in almost all cabinets is perfectly capable of holding this weight. The key to ensuring this load-bearing capacity over long periods of time is preventing racking of the case.
Experienced aquarists, however, know the value of a well-made stand that won't turn to mush if soaked with water for a day or two. Advanced aquarists, such as my potential customers, require custom dimensions and other features to allow them to use sophisticated sump systems.
Building the first of these stands was a great chance for me to hone my custom cabinetry skills - under the pressure, literally, of hundreds of gallons of water.
the front frame of a 90-gallon stand |
My first commission was a frame-and-panel cabinet stand for a 90-gallon tank. That's about 1,400 pounds of water and rocks. As it turns out, the standard frame-and-panel design seen in almost all cabinets is perfectly capable of holding this weight. The key to ensuring this load-bearing capacity over long periods of time is preventing racking of the case.
Wednesday, October 20, 2010
Oh UPS, I tried to give you money for SO LONG!!!
I tried to set up an account with UPS to ship packages from my company Wine on Deck. But there were so many technical problems, multiple accounts created, blah, blah, blah. It was too hard. Then I tried the same thing with FedEx. here is my "farewell" letter to my local UPS Business rep:
Saturday, September 25, 2010
Festool Review: Rotex RO 150 FEQ
The Back Story
The Rotex 150 FEQ is a $500 hand-held orbital sander. With a 6" diameter pad, it's the same size as dozens of other orbital sanders on the market - all of which are half the price (or less) than the "150 FEQ". What, I asked my friend and (Rockler Cambridge Assistant Manager) Pete, could make this sander twice as good as the rest? After all, I already own a 5" orbital sander - a Festool ETS 150.
Sunday, May 9, 2010
Tormek vs. Vintage Wet Wheel Bench Grinder
To call them bench grinders is, I have discovered, an offense to owners of wet-wheel tool-sharpening rigs. A grinder, you see, hogs metal off of a blade. A wet-wheel, on the other hand, is a precision machine capable of sharpening tool steel that only honing with a leather strop could sharpen it further. The differences between "grinders" and "wet wheels" range from
The Collectors
Who are the collectors? Collectors are everywhere, of course. You have your stamp collectors, the baseball card collectors, the (lucky few) car collectors...pretty much anything that's ever been made has been - or is currently - collected. I'm something of a collector myself, boasting a stereo that is way too big for my living room, and a basement piled with vintage speakers and tube amps in various states of repair. In general, I have no problem with collectors. I even admire those collectors who find and repair older items so that future generations can enjoy their (often superior) quality.
But there is one type of collector I'm really starting to dislike:
Rockler: my go-to Woodworking Store
I love my local woodworking store. It's called Rockler, and it's in Porter Square in Cambridge, Massachusetts. There are, apparently, Rockler stores throughout the U.S., and they have an online store as well. Rockler's closest competition is a chain called Woodcraft, and another competitor is the online retailer Lee Valley. But so long as Rockler carries what I want to buy (they occasionally don't), I will always go to them. Why? Read on:
Monday, April 12, 2010
Festool's Proprietary Bench Dogs: a Step too Far
Engineered Incompatibility: a Festool Core Design Principle
Anybody familiar with Festool probably also knows that the company's tools tend to not fit industry standard accessories. For example, Festool's TS-series plunge-cut saws ride on a guide rail, but won't fit into rails that fit most other circular saws.
Festool's Not Just for The Pros: Quality Tools are even More Critical to the Inexperienced User
Festool from a Novice's Perspective
The first time I walked into my local woodworker's store, I was seeing most of the power tools on the market for the first time. I had never used a router or band saw, and had never heard of a jointer or thickness planer. Until that day, my only exposure to woodcraft was through my contractor friends (who also hadn't heard of a jointer) and memories of my dad's hobbyist hand tools.
Tuesday, April 6, 2010
Ikea Expedit Clone - From Reclaimed Heart Pine
My girlfriend and love of my life (xoxo MyMy :-) has been in need of shelving. And she was getting tired of waiting for my cabinetry skills to improve beyond bookshelves. So when she pointed to the Ikea Expedit shelf and said "We need this for our daughter's toys...NOW" - I figured it was time to leave the world of bookshelves and tables and make a proper case.
Luckily, I didn't end up trying to make a real cabinet, carcase and all. Instead, I decided to build a clone of the Ikea piece. With a couple of tweaks, of course.
Sunday, February 28, 2010
A bookshelf becomes a coffee table: Thanks to my Delta X Jointer
I have been on a roll recently: in spite of being a total newb when it comes to furniture-making, I have completed two (that's right TWO ;) bookshelves of acceptable functionality and workmanship. Both of them look great from thirty yards.
When I decided to give bookshelves another go, I decided to get fancy. I made a jig for my Delta 1 3/4 HP hybrid saw, and cut 3-degree angles in each side of the case, to give the shelf a back-sloping look. To add to the sloping effect, I laid a stripe of curly maple between two wide planks of mahogany, and cut the bases 90-degrees to the 3-degree slope, so the white maple stripes would slope backward as well. AWESOME!
But then, while having a conversation with a friend and cutting the dadoes to hang the shelves, I cut one set of grooves on the wrong side of my beautiful laminated, sloping sides! Since they were sloping, I couldn't just flip the one side over. My shelves were kaput.
But then I had an idea: What if I put the sloping edged head-to toe, then straightened the edges on my Delta? Then I'd have a beautiful table top.
Bookshelf Number Two, Part Two: Completion
Confident after my "successful" completion of a bookshelf from plans, I decided to build a similar shelf, but with a few of my own modifications. Chief among my mods: through-tenons joining the top and bottom shelves to the case. I also chose to go in another direction aesthetically: instead of the reserved, all-mahogany design of the shelf from plans, my second shelf used three types of wood, and I went for an art-deco theme.
Here are the results:
I am pretty satisfied with the through-tenons. Of course, if you look closely you'll see some mahogany wood filler around the joints.
The pitfalls of amateur design are obvious: after all, who needs such high shelves in a case so shallow?
But hey, not bad for my first through-tenons and first self-designed (and finished piece :)
Stay tuned for the tale of my third bookshelf, which had to become a coffee table after an unfortunate error with a dado blade...
Thursday, February 25, 2010
Bookshelf Number Two
After the success of my first bookshelf - which i made from plans, and which used dado grooves to hold the shelves - I decided to do the same shelf again - but this time using through-tenons and mortises to hold the top and bottom shelves, and using three (yes, three) different woods in the construction. I was going for an art-deco look. And I got it. But in the end, it was too gaudy for my taste and I let it go to some friends who really liked it.
Above: my first bookshelf. Finished in satin poly/oil finish, and with the top back-piece finished in super-shiny, thick epoxy glaze. On the right is a close-up of the glazed top backing.
Below: My second bookshelf. Wood used is curly maple, mahogany, and purple heart. The cross-shapes on the sides are created when the vertical strips of purple heart cross over the mahogany through-tenons of the top and bottom shelves. NOTE: this pic is BEFORE I added the "art-deco" style crown of vertical pieces.
Next stop on the cabinetry train: the ultimate stereo component rack :)
-isaac
Thursday, January 28, 2010
Small Bookcase, Part I
I have begun a carpentry project using plans from a book I bought from my friends at the Rockler Store in Cambridge.
So far, things are going ok. But I have noticed a few things I didn't expect. First of all, the 3/4" mahogany from Boulter Plywood in Somerville Massachusetts is exactly 3/4" thick. What a bummer! Since all boards are warped and need to be joined and planed, you can't actually get a 3/4" board from Boutler Plywood. The mahogany I found on sale at Rockler in Cambridge, Mass, on the other hand, came in at about 14/16" - a reasonable margin that at least gets you close to a final 3/4" thickness if you select your boards carefully.
To be fair, the plywood from Boulter is of good quality, they serve it up custom-cut quite quickly, and they've got a treasure-trove of hardwood plywood types that give you extreme bang-for-the-buck as well as a very flat and stable board that's inexpensive and looks almost as good as real hardwood.
I also found that the mitre gauge that came with my Delta 1 3/4 h.p. contractor's saw doesn't stop quite at 90 degrees perpendicular to the blade. I used a piece of padouk wood for a fence, and planed it down a hair across the face to correct the angle. But I fear further warping of my fence. Do i have to buy a pre-made mitre gauge or even a crosscut sled?
Using my Delta X5 joiner and DeWalt tabletop planer, I milled 3-5" boards for the shelves and sides of my bookcase. Since I had to use some mahogany from Boulter, I ended up with a thickness of 0.55" rather than the 0.75" called for in the plans. Time to turn down those 3/8" dadoes to 3/4"!
I hope the shelves hold. :)
I also made an error in joining the sides: one plank on one side measures 44" rather than the 45" called for in the plans. The mistake gave me an idea for the shape of the top of the case, which I hope to reveal later on next week.
In the meantime, take a peek at some beautiful mahogany joined boards. One of them in particular looks great. Too bad it's a shelf piece and not a side.
...And here we go on the dadoes. No routing dadoes for me. I am staying away from the beast for a little while...
Chest of Drawers FAIL!!
I recently got into woodworking, as a way to bring my designs for acoustical traps, component racks, and loudspeakers to life. Those who've visited before may know my first project was a 2'x4' foam acoustic panel, and my second was a chest of drawers.
So ambitious was I! Funny, so many people raised their eyebrows when I told them my first "real" project was a bureau. The pinnacle of cabinetry and craftsmanship! A nest of grooves, angles, and shapes that must be assembled in a particular order, and made with zero tolerance for errors in angle or dimension. My own chest was based on the memory of a friend's similar chest I had looked at the previous week. No plans, just the memory and a dream.
I proudly boasted on this blog that I expected to be finished with my chest in a matter of days. But those paying close attention read on my blog that - mid-project - I discovered a tool called the joiner. Turns out one requires a joiner in order to make a chest of drawers, and just about anything else requiring rectangular boards. I got a joiner and made my drawers (too wide for my chest's carcase), and then I bit into the front edge of my chest while trying my first-ever flush trim with a free-hand router.
Pressing on, I decided to build a new carcase, to fit the drawers I had made. After fitting that one together, I discovered I had cut several of the side dadoes in the wrong places. Another major FAIL.
It was then I realized that I needed to work from somebody else's plans. I simply don't know enough about woodworking to design my own pieces yet.
:(
But I press onward! Armed with a plan for a simple bookshelf, I am going to start with something slightly simpler, and see how I do...
Until next time, thanks for reading, and please come back soon!
-isaac
So ambitious was I! Funny, so many people raised their eyebrows when I told them my first "real" project was a bureau. The pinnacle of cabinetry and craftsmanship! A nest of grooves, angles, and shapes that must be assembled in a particular order, and made with zero tolerance for errors in angle or dimension. My own chest was based on the memory of a friend's similar chest I had looked at the previous week. No plans, just the memory and a dream.
I proudly boasted on this blog that I expected to be finished with my chest in a matter of days. But those paying close attention read on my blog that - mid-project - I discovered a tool called the joiner. Turns out one requires a joiner in order to make a chest of drawers, and just about anything else requiring rectangular boards. I got a joiner and made my drawers (too wide for my chest's carcase), and then I bit into the front edge of my chest while trying my first-ever flush trim with a free-hand router.
Pressing on, I decided to build a new carcase, to fit the drawers I had made. After fitting that one together, I discovered I had cut several of the side dadoes in the wrong places. Another major FAIL.
It was then I realized that I needed to work from somebody else's plans. I simply don't know enough about woodworking to design my own pieces yet.
:(
But I press onward! Armed with a plan for a simple bookshelf, I am going to start with something slightly simpler, and see how I do...
Until next time, thanks for reading, and please come back soon!
-isaac
Wednesday, January 27, 2010
Hi-Fi University Articles Online
I have written several articles on the platform Hubpages over the past several months. They range from educational articles about hi-fi stereos and home theaters, to reviews of gear I have owned. If you're looking to buy a hi-fi in the near future, and you don't know much about the market, you may find these articles save you a lot of money.
-isaac
- Review of the Klipsch Heresy Speaker: http://hubpages.com/hub/Klipsch-Heresey-II-Review
- Bi-Amping and Tri-Amping. Why and How: http://hubpages.com/hub/Bi-amping-and-Tri-amping-Why-and-How
- Wattage for Stereos and Home Theaters Explained: http://hubpages.com/hub/Wattage-for-Stereo-and-Home-Theaters-Explained
- What's the Difference Between Receivers and Separates? http://hubpages.com/hub/Vintage-Stereo-and-Home-Theater-University
-isaac
Thursday, January 21, 2010
DIY backstop fence for faster, more accurate repeated cuts on the mitre saw
While I was making my first chest of drawers, I had to make a lot of repetitive cuts on the mitre saw: for the drawer faces, sides, and backs, and for the inner frame supports, guide rails, and cross-members. My method of measuring each cut (I won't describe it here) was laborious, time consuming, and resulted in boards that were almost - but not exactly - the same length.
Of course, in cabinetry, almost doesn't cut it. Or at least it makes for a lot of extra work.
So I came up with a better solution: a backstop that slides to and from the saw, and can be clamped into position so repeated cuts are easy to set up, and more accurate from cut to cut.
To see more pics of my DIY backstop, and instructions on how to build it yourself, visit my Mitre Saw Backstop Hub.
Happy building!
Chest of Drawers: Part II
Well, it has been more than a week since I proclaimed that I would be finished with my chest of drawers within two days. What happened? Jointing happened. In case you don't know what jointing is, don't feel bad. I didn't either, until last week.
Last week, my friend Kiki and I were working on my chest of drawers. We were cutting the Mahogany for the drawer faces. For the taller drawers (two are designed to be 12" tall), we planned to glue two 6" boards together to create a flat 12" drawer face. But when we put the two boards together, there was a gap between them in the middle. Attempting to sand-away the sides of the boards only created new gaps elsewhere in the joint. What was going on? All the boards had been purchased pre-cut, and then we cut them to size on the table saw, so they should have been straight, right?
Wrong! Boards from the store are NOT straight. They may look rectangular, or at least flat on both sides and an edge, but they're not truly rectangular and parallel until they've been jointed and planed.
Above: A jointer
Above: A planer
Luckily, I was able to find a killer deal on a planer, jointer, and 1 3/4 HP table saw.
So, now all of the drawer faces are jointed and planed. The sides, bottoms, and backs of the drawers are dadoed and ready to be assembled into drawers.
Here we go!
Last week, my friend Kiki and I were working on my chest of drawers. We were cutting the Mahogany for the drawer faces. For the taller drawers (two are designed to be 12" tall), we planned to glue two 6" boards together to create a flat 12" drawer face. But when we put the two boards together, there was a gap between them in the middle. Attempting to sand-away the sides of the boards only created new gaps elsewhere in the joint. What was going on? All the boards had been purchased pre-cut, and then we cut them to size on the table saw, so they should have been straight, right?
Wrong! Boards from the store are NOT straight. They may look rectangular, or at least flat on both sides and an edge, but they're not truly rectangular and parallel until they've been jointed and planed.
Above: A jointer
Luckily, I was able to find a killer deal on a planer, jointer, and 1 3/4 HP table saw.
So, now all of the drawer faces are jointed and planed. The sides, bottoms, and backs of the drawers are dadoed and ready to be assembled into drawers.
Here we go!
Wednesday, January 13, 2010
My Second Woodworking Project: A Chest of Drawers
I'm very happy with my latest project: building a chest of drawers. I know, a chest of drawers is not a hi-fi-related item. And yet I'm writing about a chest of drawers here on the Wicked Hi-Fi Blog because the chest of drawers in question is my second-ever woodworking project, and I'm using it as a test-bed for my next project: the ultimate stereo component cabinet.
Now, before looking at the pictures, I remind you this is my second woodworking project. My first was a sound-absorbing panel, shown below. The work shown took place over the past three days.
Here are the pics of Day Two:
Now, before looking at the pictures, I remind you this is my second woodworking project. My first was a sound-absorbing panel, shown below. The work shown took place over the past three days.
Here are pictures of my first chest of drawers, beginning with the four main vertical supports and the six internal rectangular frames. I used a router, chisels, table saw, glue, clamps, and chop saw to make the chest so far. For wood, I used poplar for the inner framing, birch plywood with walnut veneer for the side panels, and I plan to build the drawer sides and faces from African Walnut I bought on sale at Rockler in Porter Square in Cambridge. I love that place. Big up to Peter at Rockler for answering all my questions :) !!
Here are the pics of the chest (Day One)
Here are the pics of Day Two:
As you can see, Day Two was productive: I finished all of the drawer guides, and placed, veneered, stained, and poly-ed the side panels. I also crafted two laminated accent strips out of three strips of hardwood. Here's how I made the accent strips:
And the final step on Day Two was the veneer/stain/poly of the side panels:
Tune in soon for pics of the rest of the project. My goal is to have Maja using it by the morning of Day Five. :)
-isaac