 |
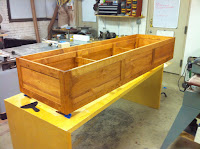
| First coat: cherry stain on the birch case |
Frame-and-panel casework is probably the most common construction method in furniture-making (tables and chairs excepted, of course). The joinery isn't too hard, either, which is - I'm sure - one reason for the popularity of frame-and-panel cases among both cabinet makers and finish carpenters.
But for the self-taught novice, there are some challenges to be overcome. Most of them have to do with keeping the angles square, the frame parts straight, and all similar pieces cut in the same exact way. So much of furniture making relies upon techniques to ensure such things, so my recent aquarium stands came out square and sturdy.
 |
| The tongue-and-groove joint |
Then there was the fact that this particular project - a low-slung rolling cabinet stand for a friends 280 gallon glass terrarium - was some seven feet long, longer than any case I'd yet made. This length made itself painfully relevant twice during the project:
First, cutting the tongues in the ends of 7-foot rails threw us. I had always cut tongues on the router table, but in this case the long rails had so much leverage it was impossible to keep the end straight through the cut. We eventually jigged up a 3-foot long fence that rode in the miter channel on my router table. Second, we had to go out and buy 10-foot pipes for our pipe clamps, so we could glue-up the 7-foot long front and rear panels.
The finish: quick and lustrous
Since we were doing this project for a friend who wanted to invest in a "decent-looking" piece and not spend a ton of money, we decided to do a very simple finish, but cut no corners in construction. Although the end color was to be cherry, we used some dimensioned birch I had scored at a very low price. Our client's other furniture was knotty pine with cherry finish, so we chose to use knotty pine veneer plywood for the case panels. The result is a case that's sanded to 220-grit, then hit with cherry pigment stain (our client's specification), with no sanding sealer underneath.
 |
| The bottom rail is a little blotchy with no sealer underneath |
Tung oil will polymerize in the wood, imparting a warm glow with a nice sheen. Since the stand won't be touched a lot, the oil should look good for a long time.
Things I'd do differently....
As was the case with my last end table project, corner blocks were an afterthought, cut and screwed into the case after the glue-up was dry. Luckily, with good tongue-and-groove joints (achieved with the use of stop-blocks and one-time-setups for cutting all critical dimensions), frame-and-panel cases come together square all by themselves. This case was square before we even pulled it tight. It stayed square once we did tighten the pipe clamps, and when we threw our super-accurate, 24" long square into the corners, it sat dead against the sides of the case. Still, it makes a lot of sense to screw in the corner blocks before the glues dries...or does it? Yet again, I have no teacher, so I don't really know.
When cutting tongues in the ends of the rails, we used the router table and ran the end of each rail against the fence, past the bit. Of course, we used a backing block to keep the rail end square to the fence and prevent tearout, but when it came to routing the ends of the 7-foot long rails in this piece, we encountered a problem: Our solution (a 3-foot 2x4 screwed to the face of a miter gauge, riding in the miter slot of my router table) required we re-set the main fence on the router table to be parallel to the miter slot. There went our one-time setup! But I feel even worse because it is ridiculous, and horrible form, if the router table fence has to be parallel to the miter slot in order to make a straight tongue on the end of a rail. There has to be a better way.
I still like the router for cutting tongues. For those who suggest the table saw, I remind you: these rails were seven feet long. For those who would look to the band saw or hand saw, I say: you are out of my league. No, the router is my tool for tongues. But I am looking for a way to bring the tool to the piece, rather than use the router table, especially with the longer pieces. And when I do use the router table, I am considering using miter slot-based jigs, or templates & bearing bits, instead of the usual fence.
Ahhhhh....
No comments:
Post a Comment