

I had planned to give the end table to my parents for Christmas, but my design left much to be desired. Compared to the coffee table I gave to my putative mother-in-law, the end table looked under-designed and amateurish. So I decided to make a coffee table for my parents, using both striped tops. My plan was to cut the tops and create a draping effect over the coffee table, as if the two striped tops were cloths laid out over the table's top, as in the sketch at the top of this post.
DESIGN
Designing this table was an interesting process. Since I wanted the illusion of the striped tops "draped" over the coffee table, the design of the underlying table and the legs was all-important. For example, when I tried out a design with two pedestal bases instead of four legs, the piece looked more like two tables pushed together, rather than one table with two striped cloths draped over it.
After much trial and error with these striped tops, I have become fond of staining the support assembly black. This keeps the focus on the gorgeous, all-natural color of the tops. I knew from the get-go that this piece would be made from some 3/4" dimensioned birch I have stashed at my studio, and then stained black using water-borne stain and topcoat.
I also knew that to get the effect I was looking for, I'd have to make a "sub top", over which the striped pieces would be "draped". To accentuate the sub-top (and make clear my design intention), I decided to design it as a box rather than a single panel. This gave the top some thickness, and the look of a torsion box. But rather than just have closed ends. I left the ends of the box open, and placed back-stops roughly 10 inches in on each side. The result is a coffee table with a cubby hole in each end, for remote controls, small books, coasters, etc...
 |
| clamping the top after cutting mortises |
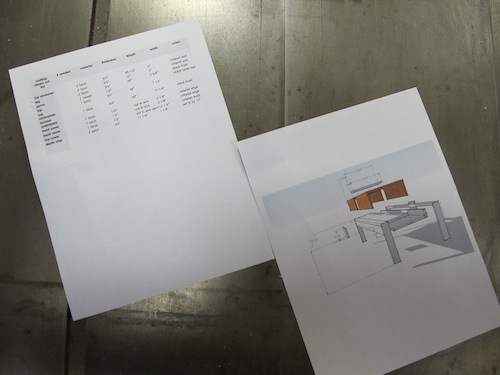 | |
| A simple 2D exploded design & a cut list are sufficient |
I used Sketchup for the design. I am becoming fond of this simple application. For easy projects like this, only a basic exploded design and a cut list were necessary.
CONSTRUCTION
I used 3/4" dimensioned birch for everything but the striped tops. Joinery was, for the most part, floating tenons via the Festool Domino joiner.
Critical in this case was pre-finishing. Because the sub-top was a box with open ends, the insides of the box had to be stained and top-coated before the box was assembled.
FINISHING - A case for Water-Borne Finishes
I am using water-borne finishes in this project. There are a few reasons: first, I've found that water-based black stain is far more potent than oil-based stain. With ebony oil stain, I had trouble achieving total blackness. No such trouble with water-based stain, which has the consistency of a milkshake.

 |
| Pre-finishing is key for this piece |
LOOKING AHEAD
I got a lot accomplished in one day. Tomorrow I'll assemble the sub-top, join the legs, stain & clear-coat the whole piece, and cut the striped tops to "drape" perfectly over the assembled table.

No comments:
Post a Comment