welcome to my blog

designing and building with wood channels my creativity and challenges my mind.
This blog is a record of my life in my studio.

Wednesday, August 3, 2011

Fluval Nano aquarium stand in cherry and purple heart

Recently, I got a commission from Skipton Unique Aquaria and Reptiles in Boston, MA, to build a nice stand for a Fluval Nano reef aquarium display next to the store's checkout counter.  I took some photos of the stand in my shop while I waited for the last coat of oil to dry.

The project began as a very basic frame and panel stand.  As I try to do at least one new thing with every project, this was the first time I used my router table to cut raised profiles on hardwood panels.  Previously, all my frame and panel cases used plywood panels. 

I wanted to give a subtle "lift" to the stand, and so I went with top and bottom horizontal panels with a sharp bevel running along their edges.

About halfway through the build, I started thinking I should push the envelope just a little bit.  And around that same time, I ran out of cherry lumber, with the adjustable shelves still left to make.  So I dug out a nice piece of purple heart, and cut the shelves from that - making a nice little surprise for anybody who opens the front door of the stand.  I wanted to give a hint of what was inside, so I hand-carved a door handle out of purple heart as well, and also added two vertical purple stripes to the back panel.

The handle was made by first cutting profiles on either side of a stick of purple heart with a 3/4" core box router bit.  Then, I cut the end profiles on the band saw.  After cleaning up the curves on my 6"x48" linishing sander,  I cut out the sides of the handle on the band saw, giving it an hourglass shape.  I finished it off with 220 grit sandpaper in the palm of my hand.  The result is cool and curved and smooth. 

The photos show the stand before rubbing out the oil finish, which will impart a smooth sheen.

CLICK "READ MORE" (in blue below) TO SEE THE PHOTOS

Monday, July 25, 2011

longer lasting sand paper & abrasive

my favorite power hand sander
Sanding is a big part of almost any furniture or home improvement project. In fact, it's one of the few steps everybody has to take, whether you're painting your bedroom, or crafting an 18th-century reproduction sideboard. If you're a weekend warrior doing your own home improvements, then you know how tedious and time consuming sanding can be, and how a new package of sand paper can disappear faster than you can say "my arm is cramping up." You've also probably noticed that in spite of all your work sanding, once the finish (or paint) dries, you can see dozens - or hundreds - of tiny scratches that were invisible before.

If all this sounds familiar, be sure to read this post before you sand again!

Thursday, July 21, 2011

Wine Bar Video Tour, Take II

I posted an edited version of the Wine Bar Video Tour on YouTube. It's shorter and I little faster-paced. I welcome comments.

Sunday, July 17, 2011

New Video: the Wine Bar Video Tour

I am so happy about my new Wine Bars, I want to tell the world!  But I'll settle for a YouTube video...

Here is my second YouTube video - the Wine Bar Video Tour.  It's another narrated slideshow, telling all about how I make Wine Bars, their design, and how they can be used to solve all sorts of wine-related challenges in your home or business. 

It's available on YouTube here: http://youtu.be/rN_Skx1jx3A

and also embedded in this post, here:

Thursday, July 7, 2011

How to make sliding dovetails

Sliding dovetail joints are very useful in a number of furniture making applications.  They are sometimes used instead of dadoes to join shelves to cabinet panels, or to join cabinet panels to each other.  Sliding dovetails are also sometimes used as drawer slides - and are better than "square" slides because they don't allow the drawer to lift away from its travel path. 

I have been afraid of dovetails for a long time, mostly because of the apparent difficulty of getting a good snug fit.  But sliding dovetails offer up a chance to make a dovetail without worrying about making LOTS of dovetails, as you would with a dovetailed case edge.  Making long sliding dovetails isn't easy, but it's totally doable, with the right power tools.

The first step is to mill the two workpieces to be joined, flat and square.  Next, pick the location of the "female" side of the joint, and plow a centered dado along the path of the joint using a router and a straight bit.  Make sure the dado is wider than the bottom of the dovetail bit, but not so wide that the dovetail will leave too little stock.  Plow the dado s deep as you want the joint to be  - or just a hair shy of that depth.

Wednesday, July 6, 2011

Wine Bars: the New Product from Wine on Deck

Now available at www.wineondeck.com

I am pleased to announce the arrival of the Wine Bar, an innovative new product from Wine on Deck. Wine Bars come a year after the introduction of Wine Wings, Wine on Deck's first consumer product. With a similar design aesthetic to Wine Wings, Wine Bars are nevertheless incredibly useful and flexible wine storage racks, that can keep up to a case of wine "on display and out of the way".

Currently, I'm offering hand-made Wine Bars in 100% solid, local flamed cherry hardwood.   Soon, I'll have a few available in curly maple, and by late July 2011 I plan to have some Wine Bars done in the classic Wine Wing pattern (curly maple and purple heart).

Wine bars mount easily to a wall stud, into plaster & lathe, cabinet panels, and even concrete.  Just locate the position of the dovetail on the wall, drill three pilot holes, and fasten the dovetail.  Then, simply slide the Wine Bar over the dovetail, push in the two locking pins, and you're ready to load the Wine Bar with up to 12 bottles of wine from any region in the world.

Friday, May 20, 2011

My first YouTube Video: a slideshow of my furniture from the past year

Over the past year practicing woodworking, I have completed a few furniture pieces, and explored some of the basic techniques of the craft of furniture making.  Apart from making Wine Wings, I have built chests of drawers, tables, bookshelves, and, of course, aquarium stands.  Now I have made a video slide show out of the pics I've taken of these pieces.

I could have better pictures, for sure.  And I didn't include pictures of the bookshelves I made early on, which we use in our home.

But it's a nice slideshow anyway:

Thursday, May 19, 2011

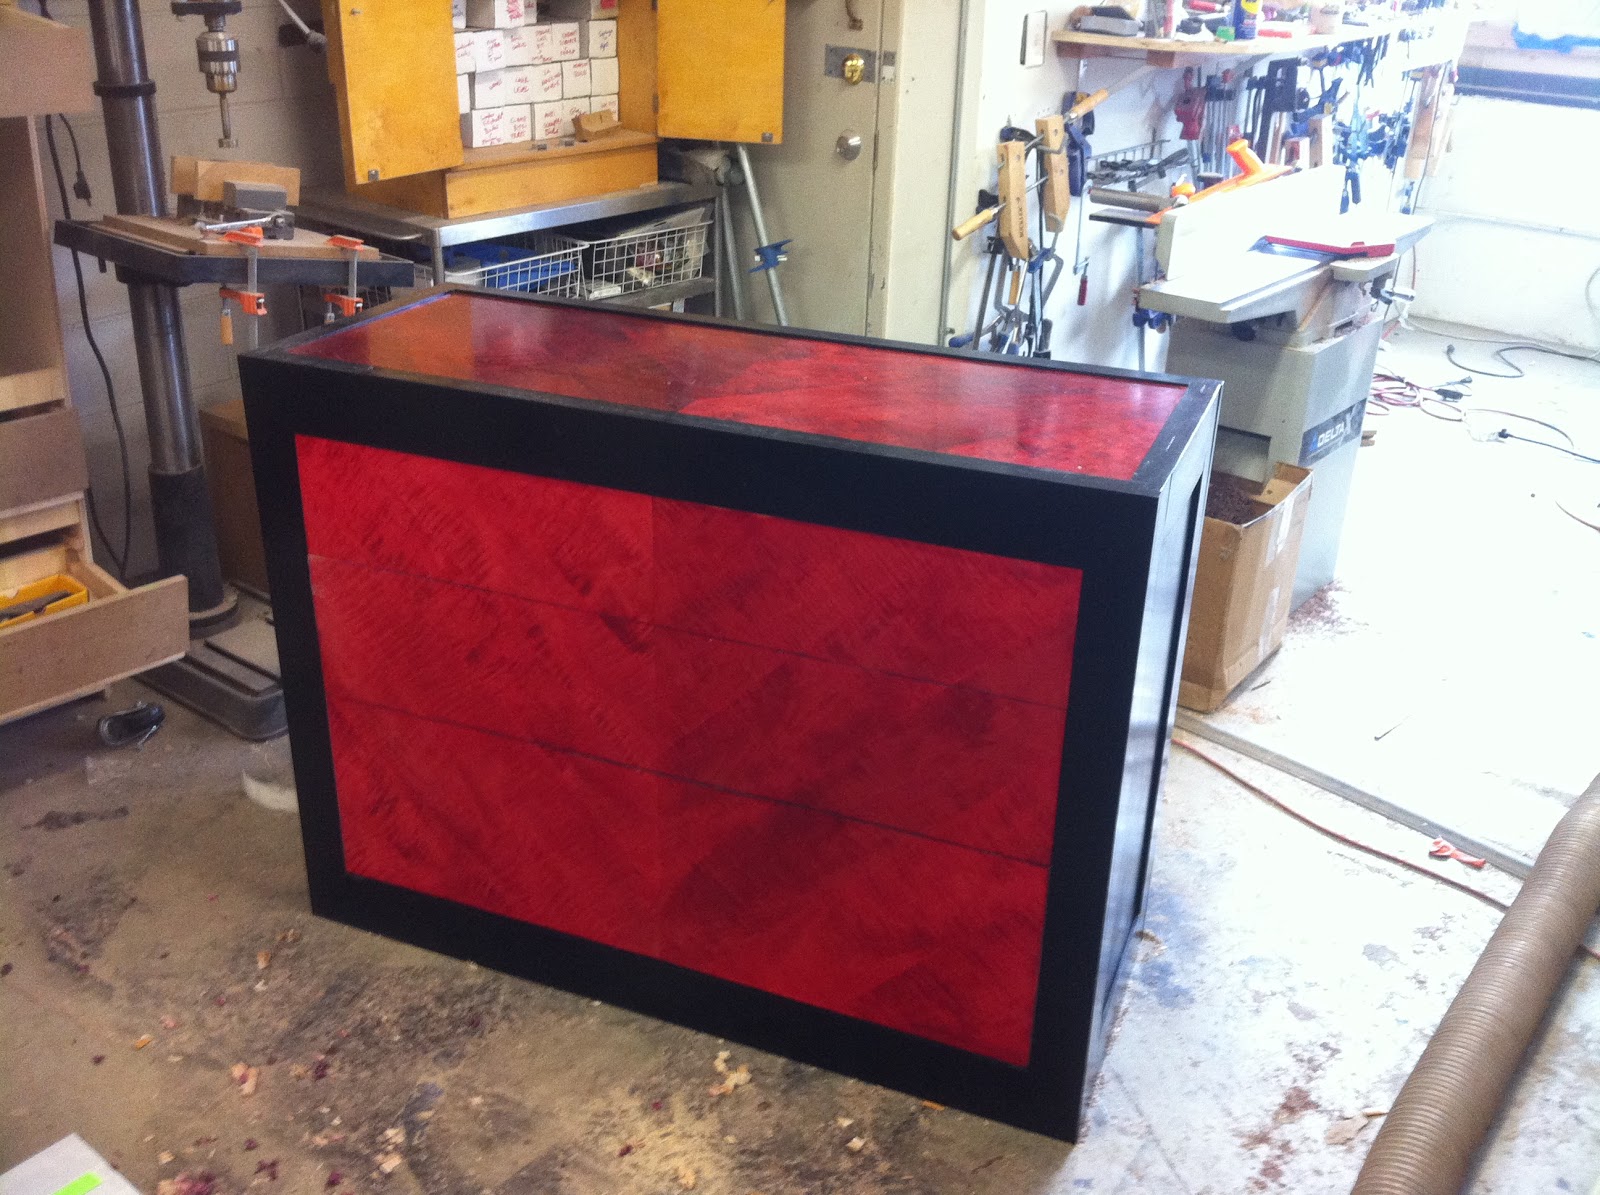
A dresser rises - phoenix-like - from the scrap heap...

If economy is a hallmark of good design, then this dresser is one for the record books.  Every single part of it was a piece of scrap, nearly unsuitable for furniture making.

It's also my first experiment with using water-based dye in furniture.  The case is actually a 90 gallon aquarium stand, which I cracked when driving a screw into dry birch.  It's strong enough to be a dresser, so I fixed the crack and added some drawer runners inside.  The drawers are made from sheets of scrap 1/4" plywood, scrap 3/4" birch & maple, and scrap 3/4" MDF.  They're heavy but they work.

About the drawer fronts: from ugly to sexy
The drawer faces and top are made from scrap curly maple.  This lumber was NOT premium by any stretch: the boards were thin, pitted, narrow, and covered with the unsightly "brown hearts" that furniture makers avoid.  Because of the brown hearts, I knew I would need to color the drawer fronts and top somehow, and I didn't want to use stain, which dulls curly maple. 

Because the boards were so narrow, I wouldn't be able to use a single board for each drawer.  And because the "curls" were so spotty, it would be impossible to make two boards look like a single board.  To get around these visual problems, I decided to form a "V" shaped panel, with each board angling toward the center line at 45 degrees.

Once I had made my V shaped panels, it was a natural choice to use red and burgundy dye to bring out the wavy figure of the curly maple, and bring a bit of visual consistency to the mish-mash of light and dark grain.

I sized the drawer fronts so each drawer was taller than the next by a ratio of 1:1.618 - the golden ratio.  Then I cut the drawer front panel into three strips of the appropriate size.

The handles: routed from a scrap VG Fir 2x4
I like using VG fir for the moldings on large aquarium stands.  Hence, I have some scraps of VG Fir 2x4.  VG Fir is knot-free and easily milled, and well cured, unlike fir studs.  to size the handles, I divided the width of the dresser by 10 to get a length for the small handle of 4.8 inches.  Then, I multiplied the length of the small handle by the golden ratio, to get the length of the middle handle, and again for the large handle. 

The drawer slides
I used Rockler's less expensive medium duty drawer slides.  If I were to do it again, I would use the heavy duty slides, or, even better, use the medium duty slide from Accuride, which is more robust and slides straighter.

The Feet
I was able to use pieces of 3/4" maple as short as 5" to make the feet.

The finish
I finished the dyed maple parts with shellac, then polyurethane.  The case was finished with black water-borne stain and water-based lacquer (It was an aquarium stand, remember?).

The Verdict:
Some drawer parts were badly scarred scrap
I never thought of myself as somebody who would make full-scale drawings, or even cardboard mockups.  But in this case, you cold say I made a "full scale, full materials" mockup of a design I will try again.  The vision is for a dresser with drawers like jewels: the drawer fronts would have chamfered edges, like the face of a square-cut gemstone.  they would be made of white figured hardwood with a large figure, such as quilted birch, and dyed the color of gemstones.  Rubies, Emeralds, Sapphires, etc.  I may do a dresser first, or a jewelry box...se bijoux!

Tuesday, May 17, 2011

Great Video showing picture frame clamping setup on the bench

I like this technique!  If you have a workbench with dog holes, it's possible to set up this clamping system right on the bench top. These kinds of clamps are great for general work holding on the bench.

Saturday, May 14, 2011

DIY sanding block & Klingspor Sand Paper for Sand Flee

For final sanding and rubbing out a finish, a good sanding block is essential.  These final finishing steps require precision and flatness, and are always prone to accidental "cutting through" on the edges of a piece.  Power sanders are often too much tool, and anyway the final sanding and polishing should be done in a linear motion anyway.

For sanding of profiles, such as molding and flutes, a shop-made sanding block is the only way to get into tight curves and corners.

This post is about how to make sanding blocks for any purpose.  It includes tips from my experience on how to outfit a sanding block for perfect results that are nearly fool proof.

Using Dye in Furniture Design

A dyed chest.  All it needs are feet and drawer pulls and I'm done!
When I first got into woodworking, I didn't like the idea of using dyes and stains.  Stains, which are essentially thinned pain - pack the pores in wood with pigment, highlighting the grain by masking the wood.  Why, I thought, would anybody want to mess up wood's natural beauty?

I still don't use stains, but I've changed my mind about dyes.  Unlike stains, dyes penetrate the wood fibers rather than pack the pores with pigment.  Dyes highlight the natural figure and chatoyancy in wood, and range in color from subtle browns and yellows, to intense reds, blues, and greens.  Dyes are often used with highly figured, light-colored woods, most notably curly maple.

Monday, May 9, 2011

Decware Zen Open Baffle Project

I have decided to build another open baffle speaker, and instead of making my own design, I am going to use the plans for the Zen Open Baffle from Decware. 

The Zen Open Baffle is the highly-touted open baffle design that Decware founder Steve Deckert claims produces percussive, deep bass down to 50 Hz.  It achieves this bass response by way of a network of two resonant chambers and a horn, incorporated behind the baffle.  This network amplifies the rear-firing energy form the Zen's single full-range driver, and can be adjusted for bass response by opening or closing a valve a the top of the chamber, underneath the back of the driver.

Tuesday, May 3, 2011

Minwax Polyshades vs. Water-Based Black Stain Comparison

Getting a good black finish on furniture can be a challenge.  There are plenty of ways to attack the problem, and I have tried most of them.  Today, I compare Minwax Polyshades black polyurethane, to General Finishes' Black water-based stain.  I'll give you my verdict right up front, in case you don't have time to read this entire post: use a water-based black stain such as General's.  Don't go the oil-based route, and don't use Minwax Polyshades.

I have long preferred water-based black stain for getting my furniture black, for a few reasons.
  1. First, I like the water-based cleanup process (just rinse with water).  
  2. Second, I have always had problems with oil-based black stains, especially if I'm brushing them on, because oil based stains have a tendency to stick to the brush, and it's easy to remove stain from the work while trying to put it on.  This is a problem peculiar to black stain, because with black stain, the goal is usually a completely black finish, whereas with other stains the goal is merely to tint the wood, or bring out the grain.  
  3. Third, water-based finishes, including stains, dry much faster than oil-based finishes, and they tend to flow out more evenly, leaving a uniform finish on the work.  

Saturday, April 30, 2011

Festool TS 75 plunge cut circular saw review

The Festool TS 75 plunge cut saw is a big circular saw.  So big, in fact, that my contractor friend Kris doesn't much like it.  He's used to wielding his 5" Makita freehand - driving it up walls and across sheet goods with ease.  The TS 75 is more suited to riding on one of Festool's aluminum guide rails, like some new breed of panel saw.

And here the TS 75 performs as well as I could ask.  I have used the TS 75 to melt through sheet goods.  I used it to size my bench top, which was made from two layers of 3/4" MDF, one layer of 3/4" plywood, and 1/4" of hardboard.  That's 2 1/2" of dense material.  But the TS 75, with it riving knife backing up the blade, made short work of it, with blade capacity to spare.

Festool Rotex Sander Review

I have been using my Festool Rotex sander for about a year now, and I love it.  The Rotex is special because of its two sanding modes: gear-driven circular mode, and a traditional orbital mode.  I use the gear mode to hog off material, as in smoothing or shaping the work.  Since buying the Rotex, my belt sander hasn't seen the fluorescent light of my shop.  If I'm sanding a big panel, I'll start in gear mode with 80 grit, then proceed up to 180 in gear mode.  Then I switch to orbital mode and go over the piece again at 180, then to 220.  I finish off with 220 and 320 by hand, using my handy sanding block with a Velcro sole.  I recommend the Rotex for anybody in the market for an orbital sander, and especially somebody in the market for a single sander that can do as much as possible.  You might never buy a hand-held belt sander once you have a Rotex.

Wednesday, April 20, 2011

the perfect gift


A friend of mine - Vicco Von Voss - is a master furniture maker and timber framer.  He works out of a studio on the Eastern Shore of Maryland, where he gets much of his lumber stock from fallen trees on his property and that of neighbors.  Vicco's projects can be quite large, and he uses premium lumber.  As a result, his scrap lumber is like manna from heaven to a guy like me.  So when he brought up a truckload of lumber from his personal stockpile, I was overjoyed.

Among the treasures were a walnut crotch, a dozen large pieces of walnut veneer, cherry veneer, and eight walnut boards from a flitch he milled himself.  All of the lumber was air dried on his property.  To learn more about Vicco and his work, visit his website at http://www.viccovonvoss.com/

Thanks Vicco!

Thursday, April 14, 2011

Review of 3 Drills: Ridgid Fuego, DeWalt DC720, and Festool 15+3

My fav: The Festool 15+3
I have three drills in my shop: a Ridgid Fuego mini drill, a larger DeWalt DC720, and a Festool 15+3.  This post is a "light" anecdotal review of each of these drills, all of which I have used extensively in my shop.  In case you don't want to read this whole review, here are the highlights:


Ridgid Fuego: Small drill claims 250 inch-pounds of max torque.  Chuck has fairly significant run-out, which is only an issue where precise drilling is necessary.  But a slew of broken bits may have something to do with the run-out.  List price: $100.  Used: $50

DeWalt DC 720: larger drill claims over 1,000 inch-pounds of torque, but feels and acts as powerful as the Festool 15+3, which claims 350 inch-pounds of torque.  One of the two batteries stopped working only a month after purchase.  No battery guarantee.  Never got it replaced.  List Price: $200.  Used: $50


Festool 15+3: larger drill has three chucks, allowing it to act as a right-angle driver.  Also comes with depth-stop chuck for precise drilling.  No run-out at all, for perfectly sized holes and no broken bits.  My experience with Festool's impeccable service gives me confidence I won't be left with a hunk of junk should something break.  My experience with Festool tells me breakage is unlikely.   List price: $460.  Used Price: $360.

Verdict: The Festool 15+3 goes anywhere the Fuego can, but is more powerful and more accurate.  At a price of $360-$460 it's far more expensive than the others.  But throw in the price of a right angle driver to augment the DeWalt and Ridgid's capabilities, and the price doesn't look so bad.  Throw in the price of poorly-made holes and broken bits, and the Festool starts to look pretty competitive.  Add in the fact that Festool won't let you go more than a few days without a working tool, and Festool distributors are local stores with great service, and I think the 15+3 is the best overall value.

"Fish" stand now on sale at Skipton's

My ash and maple "fish" stand is now on sale at Skipton Unique Aquaria and Reptiles.  It's made for a 20 gallon "tall" tank.  I cut the door decorations on my band saw.  The stand features a front cabinet door with soft-close hidden European hinges.

Frame and Panel Case Tips: Rattle-Free Panels

I use frame and panel construction for many of my cases.  There are a few well-known rules of good frame and panel case-making that ensure a warp-free, durable case.  In case my readers are unfamiliar with these rules, they are:
  1. The grooves in the frame parts (rails and stiles) should be centered on the edge of the frame parts, and at least 1/4" from the edge.  
  2. The depth of the frame grooves should be no deeper than the distance of the groove from the edges of the frame part.  This ensures the frame is strong enough stand up to use and abuse.
  3. The tongues of the panel should not reach all the way to the bottoms of the grooves in the frame parts.  This allows for side-to-side expansion of the panel and the frame.  If the panel DOES touch the bottoms of the grooves, any expansion of the parts will result in warping of the assembly.
  4. If using a solid-wood panel, the grooves in the frame should be slightly wider than the tongue on the panel.  This lets the panel get thicker (due to seasonal movement), without splitting the frame parts. 
  5. Don't glue the panel into the frame!

Monday, April 11, 2011

My bosch 1617 Router Review

My Bosch 1617 router was the first tool I purchased in my woodworking "career".  I got it some 13 months ago, one month longer than the standard factory warranty.  The on/off switch on this router broke yesterday, making now a great time for me to submit my review of this tool.

Why I bought it in the first place:
I bought the Bosch 1617 combo package from my local Rockler store for a few good reasons:  first, it's a 2.25 HP router, which is fairly powerful for a general purpose router.  Second, the combo package comes with both a fixed base (for use in a router table) and a plunge base (for use in hand-held applications).  Third, the 1617 is priced very well: i still can't find a 2.25 HP router with both types of base for the price of the 1617 combo pack: around $230.  The 1617 came with wrenches, and two collets: a 1/4" and a 1/2".