I have been on a roll recently: in spite of being a total newb when it comes to furniture-making, I have completed two (that's right TWO ;) bookshelves of acceptable functionality and workmanship. Both of them look great from thirty yards.
When I decided to give bookshelves another go, I decided to get fancy. I made a jig for my Delta 1 3/4 HP hybrid saw, and cut 3-degree angles in each side of the case, to give the shelf a back-sloping look. To add to the sloping effect, I laid a stripe of curly maple between two wide planks of mahogany, and cut the bases 90-degrees to the 3-degree slope, so the white maple stripes would slope backward as well. AWESOME!
But then, while having a conversation with a friend and cutting the dadoes to hang the shelves, I cut one set of grooves on the wrong side of my beautiful laminated, sloping sides! Since they were sloping, I couldn't just flip the one side over. My shelves were kaput.
But then I had an idea: What if I put the sloping edged head-to toe, then straightened the edges on my Delta? Then I'd have a beautiful table top.
Sunday, February 28, 2010


Bookshelf Number Two, Part Two: Completion
Confident after my "successful" completion of a bookshelf from plans, I decided to build a similar shelf, but with a few of my own modifications. Chief among my mods: through-tenons joining the top and bottom shelves to the case. I also chose to go in another direction aesthetically: instead of the reserved, all-mahogany design of the shelf from plans, my second shelf used three types of wood, and I went for an art-deco theme.
Here are the results:


 I am pretty satisfied with the through-tenons. Of course, if you look closely you'll see some mahogany wood filler around the joints.
The pitfalls of amateur design are obvious: after all, who needs such high shelves in a case so shallow?
But hey, not bad for my first through-tenons and first self-designed (and finished piece :)
Stay tuned for the tale of my third bookshelf, which had to become a coffee table after an unfortunate error with a dado blade...
Here are the results:


The pitfalls of amateur design are obvious: after all, who needs such high shelves in a case so shallow?
But hey, not bad for my first through-tenons and first self-designed (and finished piece :)
Stay tuned for the tale of my third bookshelf, which had to become a coffee table after an unfortunate error with a dado blade...
Thursday, February 25, 2010
Bookshelf Number Two
After the success of my first bookshelf - which i made from plans, and which used dado grooves to hold the shelves - I decided to do the same shelf again - but this time using through-tenons and mortises to hold the top and bottom shelves, and using three (yes, three) different woods in the construction. I was going for an art-deco look. And I got it. But in the end, it was too gaudy for my taste and I let it go to some friends who really liked it.


Above: my first bookshelf. Finished in satin poly/oil finish, and with the top back-piece finished in super-shiny, thick epoxy glaze. On the right is a close-up of the glazed top backing.
Below: My second bookshelf. Wood used is curly maple, mahogany, and purple heart. The cross-shapes on the sides are created when the vertical strips of purple heart cross over the mahogany through-tenons of the top and bottom shelves. NOTE: this pic is BEFORE I added the "art-deco" style crown of vertical pieces.

Next stop on the cabinetry train: the ultimate stereo component rack :)
-isaac


Above: my first bookshelf. Finished in satin poly/oil finish, and with the top back-piece finished in super-shiny, thick epoxy glaze. On the right is a close-up of the glazed top backing.
Below: My second bookshelf. Wood used is curly maple, mahogany, and purple heart. The cross-shapes on the sides are created when the vertical strips of purple heart cross over the mahogany through-tenons of the top and bottom shelves. NOTE: this pic is BEFORE I added the "art-deco" style crown of vertical pieces.

Next stop on the cabinetry train: the ultimate stereo component rack :)
-isaac
Thursday, January 28, 2010
Small Bookcase, Part I
I have begun a carpentry project using plans from a book I bought from my friends at the Rockler Store in Cambridge.
So far, things are going ok. But I have noticed a few things I didn't expect. First of all, the 3/4" mahogany from Boulter Plywood in Somerville Massachusetts is exactly 3/4" thick. What a bummer! Since all boards are warped and need to be joined and planed, you can't actually get a 3/4" board from Boutler Plywood. The mahogany I found on sale at Rockler in Cambridge, Mass, on the other hand, came in at about 14/16" - a reasonable margin that at least gets you close to a final 3/4" thickness if you select your boards carefully.
 To be fair, the plywood from Boulter is of good quality, they serve it up custom-cut quite quickly, and they've got a treasure-trove of hardwood plywood types that give you extreme bang-for-the-buck as well as a very flat and stable board that's inexpensive and looks almost as good as real hardwood.
I also found that the mitre gauge that came with my Delta 1 3/4 h.p. contractor's saw doesn't stop quite at 90 degrees perpendicular to the blade. I used a piece of padouk wood for a fence, and planed it down a hair across the face to correct the angle. But I fear further warping of my fence. Do i have to buy a pre-made mitre gauge or even a crosscut sled?
Using my Delta X5 joiner and DeWalt tabletop planer, I milled 3-5" boards for the shelves and sides of my bookcase. Since I had to use some mahogany from Boulter, I ended up with a thickness of 0.55" rather than the 0.75" called for in the plans. Time to turn down those 3/8" dadoes to 3/4"!
I hope the shelves hold. :)
I also made an error in joining the sides: one plank on one side measures 44" rather than the 45" called for in the plans. The mistake gave me an idea for the shape of the top of the case, which I hope to reveal later on next week.
In the meantime, take a peek at some beautiful mahogany joined boards. One of them in particular looks great. Too bad it's a shelf piece and not a side.


...And here we go on the dadoes. No routing dadoes for me. I am staying away from the beast for a little while...

So far, things are going ok. But I have noticed a few things I didn't expect. First of all, the 3/4" mahogany from Boulter Plywood in Somerville Massachusetts is exactly 3/4" thick. What a bummer! Since all boards are warped and need to be joined and planed, you can't actually get a 3/4" board from Boutler Plywood. The mahogany I found on sale at Rockler in Cambridge, Mass, on the other hand, came in at about 14/16" - a reasonable margin that at least gets you close to a final 3/4" thickness if you select your boards carefully.

I also found that the mitre gauge that came with my Delta 1 3/4 h.p. contractor's saw doesn't stop quite at 90 degrees perpendicular to the blade. I used a piece of padouk wood for a fence, and planed it down a hair across the face to correct the angle. But I fear further warping of my fence. Do i have to buy a pre-made mitre gauge or even a crosscut sled?
Using my Delta X5 joiner and DeWalt tabletop planer, I milled 3-5" boards for the shelves and sides of my bookcase. Since I had to use some mahogany from Boulter, I ended up with a thickness of 0.55" rather than the 0.75" called for in the plans. Time to turn down those 3/8" dadoes to 3/4"!
I hope the shelves hold. :)
I also made an error in joining the sides: one plank on one side measures 44" rather than the 45" called for in the plans. The mistake gave me an idea for the shape of the top of the case, which I hope to reveal later on next week.
In the meantime, take a peek at some beautiful mahogany joined boards. One of them in particular looks great. Too bad it's a shelf piece and not a side.


...And here we go on the dadoes. No routing dadoes for me. I am staying away from the beast for a little while...

Chest of Drawers FAIL!!
I recently got into woodworking, as a way to bring my designs for acoustical traps, component racks, and loudspeakers to life. Those who've visited before may know my first project was a 2'x4' foam acoustic panel, and my second was a chest of drawers.
So ambitious was I! Funny, so many people raised their eyebrows when I told them my first "real" project was a bureau. The pinnacle of cabinetry and craftsmanship! A nest of grooves, angles, and shapes that must be assembled in a particular order, and made with zero tolerance for errors in angle or dimension. My own chest was based on the memory of a friend's similar chest I had looked at the previous week. No plans, just the memory and a dream.
 I proudly boasted on this blog that I expected to be finished with my chest in a matter of days. But those paying close attention read on my blog that - mid-project - I discovered a tool called the joiner. Turns out one requires a joiner in order to make a chest of drawers, and just about anything else requiring rectangular boards. I got a joiner and made my drawers (too wide for my chest's carcase), and then I bit into the front edge of my chest while trying my first-ever flush trim with a free-hand router.
Pressing on, I decided to build a new carcase, to fit the drawers I had made. After fitting that one together, I discovered I had cut several of the side dadoes in the wrong places. Another major FAIL.
It was then I realized that I needed to work from somebody else's plans. I simply don't know enough about woodworking to design my own pieces yet.
:(
But I press onward! Armed with a plan for a simple bookshelf, I am going to start with something slightly simpler, and see how I do...
Until next time, thanks for reading, and please come back soon!
-isaac
So ambitious was I! Funny, so many people raised their eyebrows when I told them my first "real" project was a bureau. The pinnacle of cabinetry and craftsmanship! A nest of grooves, angles, and shapes that must be assembled in a particular order, and made with zero tolerance for errors in angle or dimension. My own chest was based on the memory of a friend's similar chest I had looked at the previous week. No plans, just the memory and a dream.

Pressing on, I decided to build a new carcase, to fit the drawers I had made. After fitting that one together, I discovered I had cut several of the side dadoes in the wrong places. Another major FAIL.
It was then I realized that I needed to work from somebody else's plans. I simply don't know enough about woodworking to design my own pieces yet.
:(
But I press onward! Armed with a plan for a simple bookshelf, I am going to start with something slightly simpler, and see how I do...
Until next time, thanks for reading, and please come back soon!
-isaac
Wednesday, January 27, 2010
Hi-Fi University Articles Online
I have written several articles on the platform Hubpages over the past several months. They range from educational articles about hi-fi stereos and home theaters, to reviews of gear I have owned. If you're looking to buy a hi-fi in the near future, and you don't know much about the market, you may find these articles save you a lot of money.
-isaac
- Review of the Klipsch Heresy Speaker: http://hubpages.com/hub/Klipsch-Heresey-II-Review
- Bi-Amping and Tri-Amping. Why and How: http://hubpages.com/hub/Bi-amping-and-Tri-amping-Why-and-How
- Wattage for Stereos and Home Theaters Explained: http://hubpages.com/hub/Wattage-for-Stereo-and-Home-Theaters-Explained
- What's the Difference Between Receivers and Separates? http://hubpages.com/hub/Vintage-Stereo-and-Home-Theater-University
-isaac
Hi-Fi University Articles Online
I have written several articles on the platform Hubpages over the past several months. They range from educational articles about hi-fi stereos and home theaters, to reviews of gear I have owned. If you're looking to buy a hi-fi in the near future, and you don't know much about the market, you may find these articles save you a lot of money.
-isaac
- Review of the Klipsch Heresy Speaker: http://hubpages.com/hub/Klipsch-Heresey-II-Review
- Bi-Amping and Tri-Amping. Why and How: http://hubpages.com/hub/Bi-amping-and-Tri-amping-Why-and-How
- Wattage for Stereos and Home Theaters Explained: http://hubpages.com/hub/Wattage-for-Stereo-and-Home-Theaters-Explained
- What's the Difference Between Receivers and Separates? http://hubpages.com/hub/Vintage-Stereo-and-Home-Theater-University
-isaac
Thursday, January 21, 2010
DIY backstop fence for faster, more accurate repeated cuts on the mitre saw
While I was making my first chest of drawers, I had to make a lot of repetitive cuts on the mitre saw: for the drawer faces, sides, and backs, and for the inner frame supports, guide rails, and cross-members. My method of measuring each cut (I won't describe it here) was laborious, time consuming, and resulted in boards that were almost - but not exactly - the same length.
Of course, in cabinetry, almost doesn't cut it. Or at least it makes for a lot of extra work.
So I came up with a better solution: a backstop that slides to and from the saw, and can be clamped into position so repeated cuts are easy to set up, and more accurate from cut to cut.

To see more pics of my DIY backstop, and instructions on how to build it yourself, visit my Mitre Saw Backstop Hub.
Happy building!
Of course, in cabinetry, almost doesn't cut it. Or at least it makes for a lot of extra work.
So I came up with a better solution: a backstop that slides to and from the saw, and can be clamped into position so repeated cuts are easy to set up, and more accurate from cut to cut.

Happy building!
DIY backstop fence for faster, more accurate repeated cuts on the mitre saw
While I was making my first chest of drawers, I had to make a lot of repetitive cuts on the mitre saw: for the drawer faces, sides, and backs, and for the inner frame supports, guide rails, and cross-members. My method of measuring each cut (I won't describe it here) was laborious, time consuming, and resulted in boards that were almost - but not exactly - the same length.
Of course, in cabinetry, almost doesn't cut it. Or at least it makes for a lot of extra work.
So I came up with a better solution: a backstop that slides to and from the saw, and can be clamped into position so repeated cuts are easy to set up, and more accurate from cut to cut.
To see more pics of my DIY backstop, and instructions on how to build it yourself, visit my Mitre Saw Backstop Hub.
Happy building!
Of course, in cabinetry, almost doesn't cut it. Or at least it makes for a lot of extra work.
So I came up with a better solution: a backstop that slides to and from the saw, and can be clamped into position so repeated cuts are easy to set up, and more accurate from cut to cut.
Happy building!
Chest of Drawers: Part II
Well, it has been more than a week since I proclaimed that I would be finished with my chest of drawers within two days. What happened? Jointing happened. In case you don't know what jointing is, don't feel bad. I didn't either, until last week.
Last week, my friend Kiki and I were working on my chest of drawers. We were cutting the Mahogany for the drawer faces. For the taller drawers (two are designed to be 12" tall), we planned to glue two 6" boards together to create a flat 12" drawer face. But when we put the two boards together, there was a gap between them in the middle. Attempting to sand-away the sides of the boards only created new gaps elsewhere in the joint. What was going on? All the boards had been purchased pre-cut, and then we cut them to size on the table saw, so they should have been straight, right?
Wrong! Boards from the store are NOT straight. They may look rectangular, or at least flat on both sides and an edge, but they're not truly rectangular and parallel until they've been jointed and planed.

Above: A jointer

Above: A planer
Luckily, I was able to find a killer deal on a planer, jointer, and 1 3/4 HP table saw.
So, now all of the drawer faces are jointed and planed. The sides, bottoms, and backs of the drawers are dadoed and ready to be assembled into drawers.
Here we go!

Last week, my friend Kiki and I were working on my chest of drawers. We were cutting the Mahogany for the drawer faces. For the taller drawers (two are designed to be 12" tall), we planned to glue two 6" boards together to create a flat 12" drawer face. But when we put the two boards together, there was a gap between them in the middle. Attempting to sand-away the sides of the boards only created new gaps elsewhere in the joint. What was going on? All the boards had been purchased pre-cut, and then we cut them to size on the table saw, so they should have been straight, right?
Wrong! Boards from the store are NOT straight. They may look rectangular, or at least flat on both sides and an edge, but they're not truly rectangular and parallel until they've been jointed and planed.

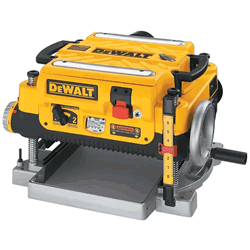
Luckily, I was able to find a killer deal on a planer, jointer, and 1 3/4 HP table saw.
So, now all of the drawer faces are jointed and planed. The sides, bottoms, and backs of the drawers are dadoed and ready to be assembled into drawers.
Here we go!

Chest of Drawers: Part II
Well, it has been more than a week since I proclaimed that I would be finished with my chest of drawers within two days. What happened? Jointing happened. In case you don't know what jointing is, don't feel bad. I didn't either, until last week.
Last week, my friend Kiki and I were working on my chest of drawers. We were cutting the Mahogany for the drawer faces. For the taller drawers (two are designed to be 12" tall), we planned to glue two 6" boards together to create a flat 12" drawer face. But when we put the two boards together, there was a gap between them in the middle. Attempting to sand-away the sides of the boards only created new gaps elsewhere in the joint. What was going on? All the boards had been purchased pre-cut, and then we cut them to size on the table saw, so they should have been straight, right?
Wrong! Boards from the store are NOT straight. They may look rectangular, or at least flat on both sides and an edge, but they're not truly rectangular and parallel until they've been jointed and planed.
Above: A jointer
Above: A planer
Luckily, I was able to find a killer deal on a planer, jointer, and 1 3/4 HP table saw.
So, now all of the drawer faces are jointed and planed. The sides, bottoms, and backs of the drawers are dadoed and ready to be assembled into drawers.
Here we go!
Last week, my friend Kiki and I were working on my chest of drawers. We were cutting the Mahogany for the drawer faces. For the taller drawers (two are designed to be 12" tall), we planned to glue two 6" boards together to create a flat 12" drawer face. But when we put the two boards together, there was a gap between them in the middle. Attempting to sand-away the sides of the boards only created new gaps elsewhere in the joint. What was going on? All the boards had been purchased pre-cut, and then we cut them to size on the table saw, so they should have been straight, right?
Wrong! Boards from the store are NOT straight. They may look rectangular, or at least flat on both sides and an edge, but they're not truly rectangular and parallel until they've been jointed and planed.
Luckily, I was able to find a killer deal on a planer, jointer, and 1 3/4 HP table saw.
So, now all of the drawer faces are jointed and planed. The sides, bottoms, and backs of the drawers are dadoed and ready to be assembled into drawers.
Here we go!
Wednesday, January 13, 2010
My Second Woodworking Project: A Chest of Drawers
I'm very happy with my latest project: building a chest of drawers. I know, a chest of drawers is not a hi-fi-related item. And yet I'm writing about a chest of drawers here on the Wicked Hi-Fi Blog because the chest of drawers in question is my second-ever woodworking project, and I'm using it as a test-bed for my next project: the ultimate stereo component cabinet.
Now, before looking at the pictures, I remind you this is my second woodworking project. My first was a sound-absorbing panel, shown below. The work shown took place over the past three days.


Here are the pics of Day Two:




Now, before looking at the pictures, I remind you this is my second woodworking project. My first was a sound-absorbing panel, shown below. The work shown took place over the past three days.

Here are pictures of my first chest of drawers, beginning with the four main vertical supports and the six internal rectangular frames. I used a router, chisels, table saw, glue, clamps, and chop saw to make the chest so far. For wood, I used poplar for the inner framing, birch plywood with walnut veneer for the side panels, and I plan to build the drawer sides and faces from African Walnut I bought on sale at Rockler in Porter Square in Cambridge. I love that place. Big up to Peter at Rockler for answering all my questions :) !!
Here are the pics of the chest (Day One)


Here are the pics of Day Two:


As you can see, Day Two was productive: I finished all of the drawer guides, and placed, veneered, stained, and poly-ed the side panels. I also crafted two laminated accent strips out of three strips of hardwood. Here's how I made the accent strips:


And the final step on Day Two was the veneer/stain/poly of the side panels:


Tune in soon for pics of the rest of the project. My goal is to have Maja using it by the morning of Day Five. :)
-isaac
Tuesday, December 8, 2009
Home Theater of Long Island Sucks; Brian Farley is Wack as Crack
Brian Farley at Home Theater of Long Island can go suck a duck. On Nov. 2, 2009, I bought a Linn amp and pre-amp combo from his store - Home Theater of Long Island - through eBay. I paid over $1,000 via PayPal that same day.
But weeks later, no gear! I sent a message, and for the next month went back and forth with Brian, the owner. On December 8 I called, and he was so smug:
"Oh, well, if I am not sending things out fast enough for you, then I will get right on it". Oooh, buddy, if I were standing next to you, you wouldn't say that!!!
He wouldn't even send the gear express mail, in spite of the fact that he hadn't sent the gear in a month. Jerk. He offered no consideration except a thin and off-the-cuff "I apologize".
Let it be known: Home Theater of Long Island won't go one inch to make their mistakes right. Bad business. You know it's true, Brian Farley of Home Theater of Long Island. Ass.
But weeks later, no gear! I sent a message, and for the next month went back and forth with Brian, the owner. On December 8 I called, and he was so smug:
"Oh, well, if I am not sending things out fast enough for you, then I will get right on it". Oooh, buddy, if I were standing next to you, you wouldn't say that!!!
He wouldn't even send the gear express mail, in spite of the fact that he hadn't sent the gear in a month. Jerk. He offered no consideration except a thin and off-the-cuff "I apologize".
Let it be known: Home Theater of Long Island won't go one inch to make their mistakes right. Bad business. You know it's true, Brian Farley of Home Theater of Long Island. Ass.
Sunday, December 6, 2009
The Dynaco ST70 Arrives, Working but Dirty
I have always wanted a tube amplifier. Not a tube-based guitar amp, but a home hi-fi amplifier. Something like a McIntosh MC-250 or Dynaco ST70 (here is a link to a good ST-70 repair and sales shop), two of the most popular tube amps in U.S. Hi-Fi history. Nowadays, tube amps are still produced by niche hi-fi manufacturers. There are also a number of tube amp kits available today as well - from companies like Velleman,
Tube amplifiers have a reputation for being for "audiophiles-only", but I have a feeling that if more people ever saw a tube amp, let alone spoke to somebody who owns one, these beautiful, elegant, amplifiers would be far more popular.
So I decided to add one more person to the list of tube amp owners: me.
When I unwrapped my "new" ST-70, I was pleased to see all of the precious vacuum tubes still intact. When I finally turned it on all the way and hooked it up to a pair of 1960's vintage Klipsch Heresys (with refurbished drivers, of course), I was pleased. Very pleased. But I can't give my full report yet: I had to run off for the weekend before my new tubes warmed up.
For now, here are some pics:


Tube amplifiers have a reputation for being for "audiophiles-only", but I have a feeling that if more people ever saw a tube amp, let alone spoke to somebody who owns one, these beautiful, elegant, amplifiers would be far more popular.
So I decided to add one more person to the list of tube amp owners: me.
When I unwrapped my "new" ST-70, I was pleased to see all of the precious vacuum tubes still intact. When I finally turned it on all the way and hooked it up to a pair of 1960's vintage Klipsch Heresys (with refurbished drivers, of course), I was pleased. Very pleased. But I can't give my full report yet: I had to run off for the weekend before my new tubes warmed up.
For now, here are some pics:


Thursday, December 3, 2009
Bose 901 Refurb

I bought a pair of 901 Series VI's just before Thanksgiving of 2009. The tops were scratched terribly, but otherwise they were pristine. When I set them up in my new listening room, they sounded terrible. Only when I took them over to my old apartment - the dreaded "reflection coffin" - did I discover what Bose has been talking about all this time. The 901 is in a class by itself - apart from the rest of the Bose line and certainly apart from the rest of the world's known speaker species. The 901 does earn Bose a spot among history's great speaker companies. Not because of the sound quality, per se, but because of the 901's unique quality of sound.
After two hours of fiddling, I found the sound of the 901's "acceptable". After half an hour of typing to the music, I awoke to something amazing happening in front of me. I was in the reflection coffin, but it sounded like I was outside at a huge music festival. I decided then and there: these speakers needed to be returned to their brand-new glory - or better.
And this time, I would take video of the process....
As I mentioned, the tops of my 901s were badly scratched. I had picked them up for $300, and decided to sand out the scratches, re-stain the cabinets, and replace the burlap grillecloth up front (somebody had spilled drinks - repeatedly - on both grilles). If the scratches proved too deep, I had two rolls of cherry wood veneer to cover the whole tops anew.
First up was to mask the grilles. At first, I left the front grilles on because I couldn't figure out how to get them off. But I did remove the back grilles, exposing the nest of 8 blue drivers that make the alleged "magic". Then I covered them with masking tape and plastic trash bag squares.
Here is a pic of the nest:
The fronts were masked in the same way, until I decided to replace the grillecloth as well and cut if off the grille itself.
Here is a pic of the front grille by itself:
Once I cut off the grillecloth, I could see staples in the grille. These staples, it turns out, are what holds the grille to the cabinet. Here is what the 901 looks like without the front grille:
Seems like a lot of speakers these days do a good job with just something like that, let alone the 8 rear-facing drivers, right? Hmm...
Removing the front grille allowed me to sand and stain all the way into the cabinet edge. Quality :)
Once we had them sanded, we stained with some "white oak" stain. The cabinets took on a rich, reddish color all the way around. Looks nice, but certainly different from the original color.
My friend helped me and we used his tools. We sanded the cabinets, and found that the scratches in the tops were too deep - they went through the veneer. So we had to sand them down and put on our new veneer.
Here is a video of the 901 Series VIs, all nice and stained :)
Bose 901 Refurb
I bought a pair of 901 Series VI's just before Thanksgiving of 2009. The tops were scratched terribly, but otherwise they were pristine. When I set them up in my new listening room, they sounded terrible. Only when I took them over to my old apartment - the dreaded "reflection coffin" - did I discover what Bose has been talking about all this time. The 901 is in a class by itself - apart from the rest of the Bose line and certainly apart from the rest of the world's known speaker species. The 901 does earn Bose a spot among history's great speaker companies. Not because of the sound quality, per se, but because of the 901's unique quality of sound.
After two hours of fiddling, I found the sound of the 901's "acceptable". After half an hour of typing to the music, I awoke to something amazing happening in front of me. I was in the reflection coffin, but it sounded like I was outside at a huge music festival. I decided then and there: these speakers needed to be returned to their brand-new glory - or better.
And this time, I would take video of the process....
As I mentioned, the tops of my 901s were badly scratched. I had picked them up for $300, and decided to sand out the scratches, re-stain the cabinets, and replace the burlap grillecloth up front (somebody had spilled drinks - repeatedly - on both grilles). If the scratches proved too deep, I had two rolls of cherry wood veneer to cover the whole tops anew.
First up was to mask the grilles. At first, I left the front grilles on because I couldn't figure out how to get them off. But I did remove the back grilles, exposing the nest of 8 blue drivers that make the alleged "magic". Then I covered them with masking tape and plastic trash bag squares.
Here is a pic of the nest:
The fronts were masked in the same way, until I decided to replace the grillecloth as well and cut if off the grille itself.
Here is a pic of the front grille by itself:
Once I cut off the grillecloth, I could see staples in the grille. These staples, it turns out, are what holds the grille to the cabinet. Here is what the 901 looks like without the front grille:
Seems like a lot of speakers these days do a good job with just something like that, let alone the 8 rear-facing drivers, right? Hmm...
Removing the front grille allowed me to sand and stain all the way into the cabinet edge. Quality :)
Once we had them sanded, we stained with some "white oak" stain. The cabinets took on a rich, reddish color all the way around. Looks nice, but certainly different from the original color.
My friend helped me and we used his tools. We sanded the cabinets, and found that the scratches in the tops were too deep - they went through the veneer. So we had to sand them down and put on our new veneer.
Here is a video of the 901 Series VIs, all nice and stained :)
Wednesday, December 2, 2009
The Energy AS-180 Subwoofer: discovering (and reparing) a sleeping giant
I came across my pair of Energy AS-180 sub-woofers in October of 2009. I bought them from a guy who was selling his whole system off. When I arrived he still had his Paradigm Studio Monitors (PSMs), an NAD 917 surround/preamp, and the pair of AS-180s. He sold it all to me for a song, and I definitely got a deal. But the guy wasn't totally honest: he told me he bought everything new at a store in 2005. But the PSMs are older than that, and I eventually discovered that the AS-180 was most likely made before 2000. As it turned out, the AS-180 may be one of my best finds to date.

When I bought the As-180s, I turned the the gain and LF-pass knobs as part of my due diligence. They made a loud crackling noise when I turned them. I have seen this problem occur eventually with every powered speaker set I've owned, and most that I've used. The culprit is corroded or dirty panoramic potentiometers (pan-pots). The only time I have ever tossed a pair of speakers was because of pots that eventually crackled all the time, not just when i turned them.
I was told by the seller that the knobs only made noise when turned. I didn't know anything about these subwoofers, but this guy's asking price for the whole lot was about what I'd pay for his PSMs alone, so I pulled the trigger and bought the lot.

I drove home with the 6-foot-tall PSMs sticking up in the air like passengers in my BMW 325i convertible (pictured right) - top down - one up front and one in the back, where my daughter usually sits. The 4.5-cubic-foot AS-180s were in the trunk, which was held closed with a twisted coat-hanger I found in the layer of junk lining the trunk floor. I had to chuckle when - with my daughter's booster seat, my leather coat, and my briefcase bounced from the trunk by the AS-180s, there was no room in my open-top 2-door for the NAD 917!
Unfortunately, when I got home and googled my new subs, nothing came up. All I found was a recent 2009 article that said Energy was known for making "decent, mid-market subwoofers sold in 'big box' stores", but that it had made a recent "admirable entry" into the high-end market. Bummer. The subs that nearly punctured my femoral artery with their floor spikes were looking like Wal Mart bricks.
At least I still had the Paradigm Studio Monitors. They were worth the money on their own. I set up the PSMs and the AS-180s in my home theater - bumping out a gorgeous pair main speakers and my trusty SW1 & Slave subwoofer set - and left to attend an afternoon alumni event.
When I returned home, the power was off at the house. Inside, my girlfriend and *our* four-year-old daughter were sitting on the couch, doing a puzzle together. My heart was warmed. But then both ladies lit up with frantic descriptions of loud, scary noises coming from the stereo. Crackling, really loud, coming from the subwoofers, they thought. When they tried to turn them off, the noise got louder and changed into a whine and crackling. Eventually, my girlfriend threw the circuit breaker.
I began to rue my eagerness earlier in the day to pounce on an offer I couldn't believe. My new subs were really starting to look like bricks. I had scored only a mediocre deal, and spent money that I really didn't have to get it.
Still, in the spirit of taking this whole speaker repair thing seriously, I was resolved to see this through to the end: to not toss the AS-180s like I did my last pair of pan-potted speakers. To find replacement pots, get out the soldering iron, fix them, and sell them. I figured their size alone could get me $50 each for them, no matter how Mickey Mouse they were.
I opened the back of the two AS-180s and found the pan-pots inside the offending knobs. Then I called Energy to try and order new ones. I was transferred out of Energy to a tech guy at Klipsch. He had never heard of the AS-180. He told me that Energy, now owned by Klipsch, has started to make some really high-end stuff. But until now, everything Energy made was outsourced to China and was of generally low quality and sound. I was pretty deflated.
But then I looked down a the back panel of one of the subs, which was sitting in my lap as we spoke. The panel said "made in Canada", not "made in China". I said to the Klipsch guy: "Well, these say 'made in Canada' - not China. What does that mean?"
Then I heard something that made me smile.
"Canada?!" he exclaimed. "Well, then, you have something interesting." He went on: "See, Energy was founded by some defectors from Paradigm up in Canada. They wanted to target the audiophile market for subwoofers, so they made a few thousand subs - I don't know the model numbers - by hand in a factory in Canada. But they couldn't get anybody to review their gear, and nobody bought it, so they sold the company to a private investment firm, which moved manufacturing to China and re-focused the company on the middle market. Supposedly, the pre-China Energy's are really well made, but I haven't seen or heard any of them. They're pretty rare because they only made a few thousand."
"I seeeeeeee..." I said. Looking down at the panel again, I saw the serial number: 0241. I was getting the jitters. With the phone squeezed between my ear and shoulder, I walk-ran into the living room and got the other back panel off the table. Serial number? 0242.

I was ready to get off the phone.
"So, you guys don't have the pots for these, and don't have an equivalent one that will work?" I asked.
"Nope"
"Okay, then. Thanks for the info - see ya!" I pressed *end*, and with one panel under my arm I jumped in my ride and sped off to U Do It Electronics in Natick, MA. Surely they would have the pots.
The store DID have the right pots, and that day I performed my first pan-pot replacement. In spite of my clearly not understanding how solder behaves near a circuit board, I succeeded in eliminating all crackling noises from my AS-180s. I now use them under my Paradigm Studio Monitors (as if the Paradigm's needed any more bass support :) - via the preamp-level ins/outs - and they are fabulous.
The construction rivals that of my CSW SW1 and Slave subs, and my McIntosh speakers, which is to say, excellent. Once dialed-in (I cut them off at 120 Hz and send everything else to the PSMs, and have the gain set at 20% of full), they make even bass with fast enough response to get the low part of a slap bass or B3 organ keying. they also transition seamlessly into the PSMs, and also with other speakers I've matched them with, including little guys like Bose 301s and Paradigm Monitor 3s.
You can probably find a pair cheap, given the fact that there's no info about them yet. Expect the AS-180 and its little brother, the AS-90, to become more popular and valuable once word gets out. I would like to find the AS-90, because I think subs are overpowered, and people should have 2-4 small subs instead of 1 big one.
Time will tell. If you find an AS-180 for less than $400 per cabinet, you're getting something that will blow any new $400 sub outta tha watah!! And oh yeah, the pan-pots are an easy fix ;-)
-isaac
When I bought the As-180s, I turned the the gain and LF-pass knobs as part of my due diligence. They made a loud crackling noise when I turned them. I have seen this problem occur eventually with every powered speaker set I've owned, and most that I've used. The culprit is corroded or dirty panoramic potentiometers (pan-pots). The only time I have ever tossed a pair of speakers was because of pots that eventually crackled all the time, not just when i turned them.
I was told by the seller that the knobs only made noise when turned. I didn't know anything about these subwoofers, but this guy's asking price for the whole lot was about what I'd pay for his PSMs alone, so I pulled the trigger and bought the lot.

I drove home with the 6-foot-tall PSMs sticking up in the air like passengers in my BMW 325i convertible (pictured right) - top down - one up front and one in the back, where my daughter usually sits. The 4.5-cubic-foot AS-180s were in the trunk, which was held closed with a twisted coat-hanger I found in the layer of junk lining the trunk floor. I had to chuckle when - with my daughter's booster seat, my leather coat, and my briefcase bounced from the trunk by the AS-180s, there was no room in my open-top 2-door for the NAD 917!
Unfortunately, when I got home and googled my new subs, nothing came up. All I found was a recent 2009 article that said Energy was known for making "decent, mid-market subwoofers sold in 'big box' stores", but that it had made a recent "admirable entry" into the high-end market. Bummer. The subs that nearly punctured my femoral artery with their floor spikes were looking like Wal Mart bricks.
At least I still had the Paradigm Studio Monitors. They were worth the money on their own. I set up the PSMs and the AS-180s in my home theater - bumping out a gorgeous pair main speakers and my trusty SW1 & Slave subwoofer set - and left to attend an afternoon alumni event.
When I returned home, the power was off at the house. Inside, my girlfriend and *our* four-year-old daughter were sitting on the couch, doing a puzzle together. My heart was warmed. But then both ladies lit up with frantic descriptions of loud, scary noises coming from the stereo. Crackling, really loud, coming from the subwoofers, they thought. When they tried to turn them off, the noise got louder and changed into a whine and crackling. Eventually, my girlfriend threw the circuit breaker.
I began to rue my eagerness earlier in the day to pounce on an offer I couldn't believe. My new subs were really starting to look like bricks. I had scored only a mediocre deal, and spent money that I really didn't have to get it.
Still, in the spirit of taking this whole speaker repair thing seriously, I was resolved to see this through to the end: to not toss the AS-180s like I did my last pair of pan-potted speakers. To find replacement pots, get out the soldering iron, fix them, and sell them. I figured their size alone could get me $50 each for them, no matter how Mickey Mouse they were.
I opened the back of the two AS-180s and found the pan-pots inside the offending knobs. Then I called Energy to try and order new ones. I was transferred out of Energy to a tech guy at Klipsch. He had never heard of the AS-180. He told me that Energy, now owned by Klipsch, has started to make some really high-end stuff. But until now, everything Energy made was outsourced to China and was of generally low quality and sound. I was pretty deflated.
But then I looked down a the back panel of one of the subs, which was sitting in my lap as we spoke. The panel said "made in Canada", not "made in China". I said to the Klipsch guy: "Well, these say 'made in Canada' - not China. What does that mean?"
Then I heard something that made me smile.
"Canada?!" he exclaimed. "Well, then, you have something interesting." He went on: "See, Energy was founded by some defectors from Paradigm up in Canada. They wanted to target the audiophile market for subwoofers, so they made a few thousand subs - I don't know the model numbers - by hand in a factory in Canada. But they couldn't get anybody to review their gear, and nobody bought it, so they sold the company to a private investment firm, which moved manufacturing to China and re-focused the company on the middle market. Supposedly, the pre-China Energy's are really well made, but I haven't seen or heard any of them. They're pretty rare because they only made a few thousand."
"I seeeeeeee..." I said. Looking down at the panel again, I saw the serial number: 0241. I was getting the jitters. With the phone squeezed between my ear and shoulder, I walk-ran into the living room and got the other back panel off the table. Serial number? 0242.
I was ready to get off the phone.
"So, you guys don't have the pots for these, and don't have an equivalent one that will work?" I asked.
"Nope"
"Okay, then. Thanks for the info - see ya!" I pressed *end*, and with one panel under my arm I jumped in my ride and sped off to U Do It Electronics in Natick, MA. Surely they would have the pots.
The store DID have the right pots, and that day I performed my first pan-pot replacement. In spite of my clearly not understanding how solder behaves near a circuit board, I succeeded in eliminating all crackling noises from my AS-180s. I now use them under my Paradigm Studio Monitors (as if the Paradigm's needed any more bass support :) - via the preamp-level ins/outs - and they are fabulous.
The construction rivals that of my CSW SW1 and Slave subs, and my McIntosh speakers, which is to say, excellent. Once dialed-in (I cut them off at 120 Hz and send everything else to the PSMs, and have the gain set at 20% of full), they make even bass with fast enough response to get the low part of a slap bass or B3 organ keying. they also transition seamlessly into the PSMs, and also with other speakers I've matched them with, including little guys like Bose 301s and Paradigm Monitor 3s.
You can probably find a pair cheap, given the fact that there's no info about them yet. Expect the AS-180 and its little brother, the AS-90, to become more popular and valuable once word gets out. I would like to find the AS-90, because I think subs are overpowered, and people should have 2-4 small subs instead of 1 big one.
Time will tell. If you find an AS-180 for less than $400 per cabinet, you're getting something that will blow any new $400 sub outta tha watah!! And oh yeah, the pan-pots are an easy fix ;-)
-isaac
Subscribe to:
Posts (Atom)